https://www.motomillion.com/blogs/motomillion-blog.atomMotomillion - Motomillion Blog2024-07-11T18:57:08-04:00Motomillionhttps://www.motomillion.com/blogs/motomillion-blog/motomillion-diavel-v4-for-sale2024-07-11T18:57:08-04:002024-07-16T09:56:12-04:00For Sale: Motomillion Diavel V4 - The Ultimate Super CruiserMani Azeri
Discover the pinnacle of motorcycle engineering with the Motomillion Diavel V4, our masterful interpretation of the Ducati Diavel V4. This exceptional machine redefines the super cruiser category, blending raw power, unparalleled style, and the finest high-end components available.
Every detail of the Motomillion Diavel V4 has been meticulously crafted to provide an unrivaled riding experience. This is not just a motorcycle; it’s a statement of power, luxury, and superior performance.
From the carbon fiber wheels to the smallest detail that has been added by the experts at Motomillion, this motorcycle is truly where function meets form.
Price: $35,000 USD
Contact us today to schedule a viewing or for more information. Experience the ultimate in super cruiser luxury with the Motomillion Diavel V4 – where innovation meets perfection.
Parts List:
Termignoni 4 Uscite Dragster Edition Exhaust
Sprint Filter P08 Street Performance Air Filter
NRC Side Mount Fender Eliminator Kit
NRC Snap On Front Fork Mount LED Turn Signals
Ducabike Carbon Front Brake and Clutch Fluid Reservoir Covers
Ducabike CNC Aluminum Sprocket Carrier
Ducabike CNC Machined Rider Adjustable Foot pegs
Ducabike Mirror Delete Master Cylinder
Ducabike Rear Set Brake Lever
Ducabike Rear Set Shift Lever
Ducabike Rear Sprocket Carrier Nut
Ducabike Rear Wheel Safety Spring Clip
Brembo T-Drive Floating Front Brake Rotor
CRG AO-100 Arrow Bar End Mirror
TWM GP Style Adjustable and Folding Levers
BST Rapid TEK Carbon Fiber Wheel Set
Fullsix Carbon Fiber Front Fender
Fullsix Carbon Fiber Ignition Key Cover
Ducabike Carbon Fiber Chain Guard
ZMM Carbon Fiber Swing Arm Cover
Fullsix Carbon Fiber Rear Hugger
Fullsix Carbon Fiber Tank Cover
Fullsix Carbon Fiber Tank Side Fairing Panel
ZMM Carbon Fiber Exhaust Heat Shield
ZMM Carbon Fiber Left Side Engine Cover
ZMM Carbon Fiber Right Side Engine Cover
ZMM Carbon Fiber Sprocket Cover
TWM Caliper Spacers
TWM Front Fork Protector Axle Slider
Rizoma CNC Billet Aluminum Headlight Fairing
Superlite RS Series Lightweight Steel 520 Conversion Kit
The journey with our Yamaha R1M started some time before we even received this R1M. Previously, we had another Yamaha R1M which we were building up into something special. That build featured Marchesini wheels, the Akrapovic Evolution Exhaust, and the full Brembo upgrade, amongst many other parts. Unfortunately, after making great progress with the bike, it got stolen…
After some time, and contact with Yamaha Motor USA, we were able to acquire a brand new Yamaha R1M, and have it delivered still within its crate! It was a treat to receive a bike in that form, and truly start a bike from zero.
With the new R1M in our possession, we decided to create the Ultimate Yamaha R1M, and did we do that? Our answer is yes, but we know not everyone will agree. The entire design philosophy of this build was to take what Yamaha had already created and designed in the R1M, and build upon it by upgrading everywhere that we could see a limitation.
Remember, to hit price points and certain profit margins, manufacturers have to cut back in areas. So wherever we saw this, we strove to change and upgrade it. With this goal, we changed all the plastic pieces to full carbon fiber, upgraded the braking system to Brembo everywhere with FrenTubo carbon fiber braided brake lines, added the OZ Racing GASS forged aluminum wheels and much more.
And the stand-out piece is a World Superbike Exhaust. Our love for the Yamaha R1/R1M platform began by seeing the bike compete in the various racing series like MotoGP and World Superbike, and being in contact with Akrapovic, we received the opportunity of purchasing a true World Superbike Superstock Spec full titanium Akrapovic Exhaust system. We jumped on the opportunity and the rest is history.
With the help of BrenTuning, we received a custom tune for the WSBK Akrapovic Exhaust and reached 198 HP! That’s 198 horsepower going to the wheels, not the crank.
So did we achieve our goal of creating the ultimate Yamaha R1M? For us, the answer is yes. Others may be able to create higher horsepower examples, with crazier parts/pieces and custom swing arms, but at that point the bike is no longer something that retains the essence and character of what an R1M, and what Yamaha intended in their design. And we believe the Motomillion R1M achieves that, and pushes it to where it can and should be, making it the Ultimate Yamaha R1M.
]]>
https://www.motomillion.com/blogs/motomillion-blog/how-to-set-up-upmap-on-your-bike2022-09-28T17:18:48-04:002022-09-28T17:18:48-04:00How To Set Up UpMap on Your BikeDaniel Joshua Obregon
"UpMap is a project born from the need to improve the performance of the vehicle, in a scenario where the continuous development of electronics makes it increasingly difficult to achieve this goal with the exclusive use of exhaust systems.”
With a variety of tunes available designed for specific exhaust systems, and to remove factory restrictions, UpMap has become an essential part for unlocking the true performance of your bike.
It has even become a go-to for Streetfighter V4 / Streetfighter V4S models that have a full exhaust or a slip on, since the UpMap flash will disable the exhaust servo. Without the upmap flash you will get a check engine light on your dash.
It isn’t a necessity, but it is highly recommended. It removes the potential check engine light from having the servo removed, smoothes the throttle and puts the correct mapping on your ECU to take full advantage of the installed exhaust system.
With UpMap being such an essential asset for modified superbikes, we created this write up for an easy-to-follow tutorial to get it going on your bike.
Before getting your UpMap tune on your bike, double check that you have ordered the right plug. Your bike may have either the EU4 plug, which is the 4-pin, yellow rectangular plug, or the EU5 plug, which is 6-pin, square and red.
Usually, you can find the diagnostic plug under the rider seat (this was the case for our Ducati Streetfighter). You will either see a 4-pin (EU4) or 6-pin (EU5) plug.
Once you confirm your plug, order the correct model UpMap device and let’s get started.
Plugging In
As stated above, on most motorcycles, you will find the diagnostics plug under the rider seat. Proceed to remove your rider’s seat to access the plug.
On the Ducati Streetfighter V4S, you’ll find two bolts holding down the seat at the rear-most end. Pry the seat forward to access the bolts.
Once your seat is removed, plug in the UpMap device to the connector plug, and then connect it to your motorcycle’s diagnostic plug. Double-check that the plugs have clicked in correctly and are not loose (you do not want them coming undone while doing the map upload).
You should see the UpMap device light turn on, notifying that it is functioning and receiving power.
Finally, check that your bike is in the run position and you can now move on to the phone app.
Connecting Your UpMap
If you have not done so, head to your app store and download the UpMap app. You’ll find it by searching for UpMap.
On the main screen of the app, start by tapping the helmet icon. Then devices, and click on the plus sign (+) to add your UpMap device.
There will be a disclaimer and terms & conditions that you must accept to proceed.
After, you will have a screen showing what you must have to establish the connection.
UpMap device and cable
Active Internet connection
Bluetooth On
Run/Stop button in Run position
Once you’ve verified everything, select “Go” and proceed to select your motorcycle manufacturer. This will take you to a screen that demonstrates where you can find the diagnostics plug on your specific model.
Continue on, and you will be notified to plug in your UpMap device (if you have not done so already). Then, turn on your ignition (do not start the bike). And finally, make sure that your bluetooth is turned on.
Your phone will now search for the UpMap device. Once it is found, you will see it named by its serial number. If you have more than one UpMap device present, confirm that you are connecting to the correct device by the serial number.
Select the UpMap device, and click on Configure. The app will now update the UpMap firmware.
After the firmware is up to date, it will automatically detect your motorcycle model. Confirm that the selection is correct by clicking on the model, and then select Configure. Finally, select Confirm and End Configuration.
Getting Your Free Map
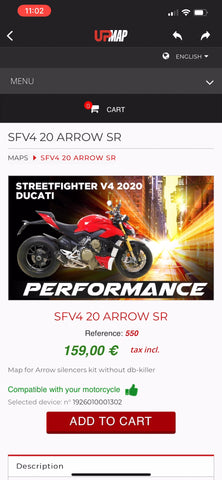
You’re halfway there. Now it’s time to select your map.
Navigate to the home screen, and tap on the shopping cart icon. On the top right there will be a drop down menu to select English if you need to.
You will see all the maps available for your motorcycle. In our case, we installed the Arrow Works Full Titanium Exhaust on the Streetfighter V4, so we chose the applicable map for it.
With your map selected, add it to your cart, and proceed to fill out the information. Make sure that the information is your own to ensure that you have full access to your motorcycle’s mapping.
Before completing your purchase, there will be a text box for vouchers. Type in “Termignonigift” to receive your first map for free.
Complete your order, and then navigate back to the home page. Tap on the helmet, and select the Maps tab. You should see your purchased maps here.
Now it is ready to be flashed onto your bike.
Flashing Your Bike
While in the Maps tab, to start the flash just tap on the map you have purchased, and select Confirm.
You will need to double check all your connections again, and that your ignition is On and in the Run position.
Once you confirm, then your phone will begin downloading the map data onto the UpMap device. This may take a few minutes. Remember to stay as close as possible to your UpMap device during these final steps to prevent any connection issues.
After it is downloaded onto the UpMap, it will begin the process of setting it up on your bike. Let it finish, and the process is complete!
With your bike now remapped, you will need to run it through 3 ignition cycles so that the ECU can adapt to the new baseline. One ignition cycle means turning on the bike, letting it warm up, take it out for a short ride and then shut it off. Repeat it 3 times, and it should be settled.
Enjoy your new UpMap tune!
]]>
https://www.motomillion.com/blogs/motomillion-blog/how-to-install-brake-cooling-ducts2022-09-14T17:19:46-04:002022-09-14T17:19:47-04:00How To Install Brake Cooling Ducts on Your BMW S1000RR M1000RRDaniel Joshua ObregonAlpha Racing is a leading manufacturer in the space, and have made their WSBK Carbon Fiber Brake Cooling Ducts available for purchase. With this, you’ll be running true WSBK parts on your build. A part with reliable and proven R&D behind it. This is why it is the one we have chosen to install on one of our S1000RR’s.
In recent years, WSBK has allowed teams to use brake cooling to combat braking issues that arise under intense conditions. Where temperatures are high and riding conditions demand for heavy braking, teams have designed carbon fiber fenders that direct air to their braking systems to prevent early brake fade.
The high temperatures that braking systems undergo when in heavy braking can cause overheating which causes the brakes to experience “brake fade.” Under normal everyday riding conditions, brake cooling ducts will not make a big enough impact to feel their benefit, but for those who push their bikes to the limits, the brake cooling ducts give added security and confidence in the performance of the bike. However, even for those who are not pushing their brakes to the limits, these cooling ducts offer the benefit of pushing the dust off the caliper pistons, helping with prolonging the caliper rebuild time by keeping caliper pistons cleaner.
Alpha Racing is a leading manufacturer in the space, and have made their WSBK Carbon Fiber Brake Cooling Ducts available for purchase. With this, you’ll be running true WSBK parts on your build. A part with reliable and proven R&D behind it. This is why it is the one we have chosen to install on one of our S1000RR’s.
Another option that we recommend is the Fullsix Carbon Fiber Brake Cooling Ducts which will offer very comparable performance.
Now, on to the install. Although not exact, the process will be very similar on the Fullsix part.
If you take a look at the Alpha Racing Brake Cooling Duct, you’ll notice that there are 2 bolt mount points and a clip at the bottom. One of the bolt mounts goes behind the front fender bracket, and the other bolt mount is placed under the top bolt of the brake caliper.
Start with removing the 2 bolts we mentioned above. The first being the one holding the front fender. The second is the top brake caliper bolt. In our case, we opted to change the original bolts for the ProTi bolts.
With the new ProTi being titanium and the calipers being aluminum, it is critical to use some anti-seize to prevent any issues removing the bolts in the future. If you are using the original bolts, you can skip this step.
With the anti-seize applied, just place the Alpha Racing brake cooling duct in place, and bolt everything down. Repeat on the other side and you are good to go!
]]>
https://www.motomillion.com/blogs/motomillion-blog/the-perfect-ducati-streetfighter-v4-build-motomillion-streetfighter-v4-build-rundown2022-08-25T12:01:01-04:002022-08-25T12:29:52-04:00The Perfect Ducati Streetfighter V4 Build | Motomillion Streetfighter V4 Build RundownDaniel Joshua ObregonWe love building bikes here at Motomillion, so we wanted to create a unique Streetfighter build that completely encompasses the spirit here at Motomillion. So, the Motomillion Streetfighter V4 was born. All parts were tastefully chosen and considered to bring together a build that makes sense, and looks right.
In late 2020, we picked up a stock Ducati Streetfighter V4 and sought out to make the ultimate road-going build.
These bikes are beautiful from the factory. There’s a reason that they’ve been voted the most beautiful bike in show at EICMA (International Motorcycle and Accessories Exhibition), the most important motorcycle trade show in the world, in 2008 and again in 2019. So, to many, the Streetfighter is a platform that does not need to be modified.
However, we love building bikes here at Motomillion, so we wanted to create a unique Streetfighter build that completely encompasses the spirit here at Motomillion. So, the Motomillion Streetfighter V4 was born. All parts were tastefully chosen and considered to bring together a build that makes sense, and looks right.
When you look at the Motomillion Streetfighter V4, if you didn’t know what the original model looks like, you may think that this is a higher spec’d factory bike. That was our aim. The perfect Streetfighter V4 build, with every part and piece coming together in such a way that the whole is greater than the individual parts.
And that is every single part we used on this build!
Feel free to check out the links to learn more about the individual parts and pick up any that you want on your Streetfighter build. The Motomillion Streetfighter is going up for sale now, and although we will miss it, we have new exciting projects coming up.
Let us know in the comments what your favorite piece was from the Motomillion Streetfighter!
]]>
https://www.motomillion.com/blogs/motomillion-blog/how-to-install-the-dieci83-radiator-guard-on-a-bmw-s1000rr2022-08-12T12:34:31-04:002022-08-12T12:35:26-04:00How To Install the Dieci83 Radiator Guard on a BMW S1000RRDaniel Joshua ObregonThe Dieci83 Radiator Guards are an inexpensive solution to a potentially very expensive problem; a leaking radiator and/or oil cooler caused by a simple rock or debris slinging from your front tire.
]]>
How To Install the Dieci83 Radiator Guard on a BMW S1000RR
You’ve got your brand new superbike, and you’re itching to take it out. But, in the first few minutes of riding you start to notice that the temperature is rising. You ride back home and notice a small leak coming from the radiator…
Because of how these bikes are designed, they run a great risk of sustaining damage to either the radiator or oil cooler. The Dieci83 Radiator Guards are an inexpensive solution to a potentially very expensive problem; a leaking radiator and/or oil cooler caused by a simple rock or debris slinging from your front tire.
A leak in your cooling system and/or oil system will not only cause your motorcycle to overheat, which might lead to a leaking head gasket, it could be very dangerous in the event that you slip on your own leaking fluids, damage your bike and potentially cause rider injury.
Have you picked up a radiator guard for your bike? Yes? No?
Now before starting, you’re going to need a T25 wrench to remove the bolts holding the side-panels on. Once you’ve grabbed your wrench, let’s move on to the install.
Start off on one side of your bike, removing the T25 bolts holding down your side panel. There should be a total of 5 on the side, and 2 behind the wheel. Repeat the same on the opposite side.
Next, you’ll have to remove the 2 bolts holding the engine spoiler. These are behind the wheel, as well. Do the same on the opposite side.
With the engine spoiler loose, remove the support bolt for the radiator mount, and repeat on the other side.
The disassembly is now complete! Now you’ll start getting the Dieci83 Radiator and Oil Cooler Guard on the bike. To start, you’ll find some foam and zip ties in the Dieci83 packaging.
Grab the foams, cut them into squares and stick them on the side that will go against the radiator and oil cooler. These foamies prevent any noise and rattling that may occur due to vibration.
After that is done, insert the zip ties on the corner edges of the Dieci83 Radiator and Oil Cooler Guards, but do not tighten them completely. These zip ties will be used to tighten the Dieci83 against the mounting points.
Now you’ll be taking your radiator guard and sliding it into place. Get it positioned where it needs to go, and slide the engine spoiler over the radiator guard so that it sits behind the spoiler. Make sure that the bottom tabs line up where the radiator support mount bolt goes. If it doesn’t line up perfectly, you can adjust the radiator guard with a little force.
We’ll be mounting the top tabs now. Note where the zip ties need to sit in the above photo, and place each side accordingly. Do not tighten them completely. We’ll tighten it up at the end, once everything has been placed correctly.
Next, is the oil cooler guard. You’ll note that the oil cooler guard has 2 tabs on the bottom rear. These will clip on to the oil cooler from the bottom, and then you can finally bolt down that radiator support mount.
To finish, you can go back to the top of the radiator to tighten up those zip ties once you’re happy with how everything is positioned, and install your side panels in reverse order.
You are done! Now you can go for rides with a little more peace of mind, that there is an extra layer of protection for when those rocks get kicked up towards your radiator and oil cooler.
Be sure to check out the full collection of Dieci83 products for your bike here.
]]>
https://www.motomillion.com/blogs/motomillion-blog/how-to-install-the-sprint-filter-p08-on-your-ducati-streetfighter-v42022-08-10T14:20:51-04:002022-08-10T14:43:40-04:00How To Install the Sprint Filter P08 on your Ducati Streetfighter V4Daniel Joshua Obregon“Ducati’s are hard to work on.” is something that you’ll hear a lot in the bike world. But this install may be the easiest there is. The 1-minute version is to turn your wheel, remove the bolts holding the filter cover and repeat on the other side. Swap your filters, and you are done. But for a few more details, tips and visual aids, keep reading below!
“Ducati’s are hard to work on.” is something that you’ll hear a lot in the bike world. But this install may be the easiest there is. The 1-minute version is to turn your wheel, remove the bolts holding the filter cover and repeat on the other side. Swap your filters, and you are done. But for a few more details, tips and visual aids, keep reading below!
Why Upgrade?
Before getting into the details, let’s go over why you may want to upgrade your air filter. First of all, depending on your mileage, it may be time to at least inspect your air filter to make sure it is still in good condition. A dirty air filter can bring damage to your engine internals that can be costly, and with air filters being a fairly inexpensive upgrade, it makes no sense to not keep it in top shape.
Now, the stock air filter will always do a sufficient job in keeping your engine clean, but to gain a bit of performance, you’ll always need to upgrade to a better option.
Our filter of choice is Sprint Filter, because of the technology they use when developing the filters, and because of its trusted status. It is used in over 70% of MotoGP bikes, and it comes standard with the Ducati Panigale V4R. And if you purchase an Akrapovic exhaust system for your bike, you’ll find that a Sprint Filter is included.
There is a reason for it being trusted by various manufacturers. Sprint Filter has done its homework when developing their air filters, and has become the leader in the performance air filter space.
But for a deeper dive into the topic, check out our blog post on this topic specifically here.
Now let’s get on to installing the Sprint Filter.
Sprint Filter Installation
To start off, you’ll be needing a 4mm hex/allen key. This is the only tool you’ll need for the entire install (besides your bare hands).
Turn your wheel completely to one side, exposing the 2 bolts that hold the air filter cover in place.
Remove the bolts using the 4mm hex/allen key. Place your bolts aside to not lose them.
Turn your wheel to the opposite side, and repeat step 2.
Now that the air filter covering is free from the bolts, you’ll be able to loosen it up, giving you space to access the air filter.
Remove the air filter and swap in your new filter. If you’re using the Sprint Filter, take note that there is a rounded edge, and a square edge. The square edge faces in, and the rounded edge faces out towards the air filter cover.
Check the air filter positioning on both sides to ensure that it is seated correctly. Complete the install by putting everything back together in reverse order!
When we said this was the easiest install, we weren’t kidding. Now get out there and ride your bike!
]]>
https://www.motomillion.com/blogs/motomillion-blog/how-to-install-the-fullsix-carbon-fiber-belly-pan2022-07-26T14:58:33-04:002022-07-26T15:06:00-04:00How to Install the Fullsix Carbon Fiber Belly Pan | MotomillionDaniel Joshua Obregon
You’ve got your belly pan, that finishing piece that can bring an entire build together. Now you’ve got to install it. We are here to help.
First things first, we will be dealing with T25 bolts, so grab the necessary driver.
You’ve got your belly pan, that finishing piece that can bring an entire build together. Now you’ve got to install it. We are here to help.
First things first, we will be dealing with T25 bolts, so grab the necessary driver.
Removing the Side Panel
To start, you will notice that 7 bolts are what hold the OEM panel in place. 5 of them are easily seen and removed from the exterior, and the remaining 2 are behind the wheel, where your radiator guard should be.
Remove these and take note of which bolts go where.
Once you complete this on both sides, you can go ahead and remove the side panel. Before putting it away, make sure to grab the clips on the inner tabs and the grommets found on each side, and transfer them onto your new Fullsix carbon fiber belly pan. (Do not force the clips into the tabs, as this can break the tabs).
Installing the Fullsix Carbon Fiber Belly Pan
With the OEM side panel removed, and the clips & grommets transferred onto the carbon belly pan, we can start working on getting it on the bike. First, we will install the side-slats, not completely, but we have to put them in place so that we can properly mount the belly pan. In the rear of the side-slats you’ll see the part number that will let you know which is the left and right (the final letter in the part number will either be L or R).
Make sure that you’re using the correct bolts, there will be short-neck bolts, medium-neck bolts, and long-neck bolts. For the side-slats, you will be using the short-neck bolts. With the bolt in-hand, go ahead and install the side-slat. You can see the placement in the image below. Do not fully tighten them, as adjustments will need to be made once the carbon belly pan goes on.
Now, you’re ready to install the carbon fiber belly pan. For this part, a helping set of hands may help. Slide the belly pan under the bike and position it in place. The engine spoiler in front of the radiator guard needs to be behind the belly pan, and the upper belly pan should be in the correct positioning behind the spoiler.
Go ahead and make sure everything is fitting into place, and you can start bolting it on. Start by grabbing one of the long-neck bolts, and insert it through the back grommet. Do the same on both sides and leave them hand-tight. Now that the carbon fiber belly pan is being held on at one end, you can line up all the holes.
Long-necked bolts go wherever there is a grommet, medium-neck bolts are used for the top tabs of the belly pan (that go behind the front spoiler), and the short-neck bolts are used for the lower tab.
You’ll be bolting down the side-slats now. You can hold it with your hand to get the correct positioning of it. On the upper end of it, there will be a tab that needs to be in place so that it can line up correctly.
Now if you’d like, you can add your stickers to the Fullsix Carbon Fiber Belly Pan to finish it off. All that’s left is to wipe it down of any finger smudges, and admire the beautiful new addition to your bike!
For further visual aid, watch the YouTube video we linked above. And leave us a comment below if there is a specific how-to you’d like us to cover. Thanks for all the support.
Go out and ride your bike!
]]>
https://www.motomillion.com/blogs/motomillion-blog/what-makes-sprint-filter-better-than-others-tech-talk-motomillion2022-07-07T10:44:37-04:002022-07-07T11:03:09-04:00What Makes Sprint Filter Better than Others? Tech Talk | MotomillionDaniel Joshua ObregonSprint Filter came in and revolutionized the air filter space. They did this by using new material: Polyester Fabric.
]]>
Air Filters, your bike needs them, your car needs them, and you need to know about them. They battle between blocking foreign particles and allowing as much airflow as possible. So what is the best air filter? It’s 2022 and it’s a question that keeps getting thrown around. This is Mani from Motomillion and we’re talking about Sprint Filter.
Air Filter Rundown
Getting down to the basics, air filters clean up the air going into your engine to help burn fuel, and prevent unnecessary wear and tear to your engine internals. When dust or sand gets in through the filter, it mixes with the engine oil which is bad news for your internals.
So, cleaner air in your combustion chamber ups the efficiency and power that your engine can produce. More air also ups the efficiency, and that’s the battle manufacturers face. Keep the air cleaner to prevent wear and tear in the engine, or allow a little more dust in there for better airflow and more power.
Most bikes come with paper filters. These are pretty good at keeping dust and dirt out of your engine, but restrict the airflow. If all you care about is keeping clean air going into your engine, these do the job. Some of us, however, want a little more power.
Other materials commonly used are cotton or sponge. For cotton, K&N is an example that uses it for higher airflow. Cotton gauze is more porous (compared to the paper air filters), so it flows more air, but usually cotton is coated in oil to catch more of the fine dust particles. A plus about these cotton filters is that they can be washed and reused, but you need to re-coat it with oil. And this oil-coating can be sucked into the engine, which may not do any damage to the internals, but it will damage sensors over time.
Sponge filters, well, I mean we use these more for washing than anything, right? Servicing these is messy and they need to be serviced almost every ride. Which is why you don’t really see sponge filters being used in OEM or Aftermarket applications.
But all these have one thing in common. Their achilles heel. With paper, cotton or sponge, the material cannot be made uniform, so some of the openings in the material end up being larger which allows more dust. To fix this they are coated with oil, and multiple layers of the material are used.
Sprint Filter Enters
For a long time, this was all that we had, but Sprint Filter came in and revolutionized the air filter space. They did this by using new material: Polyester Fabric.
Polyester is not affected by folding. And only a single layer needs to be used. And because of the material, each hole can be made the exact same size, so the airflow and filtering is consistent throughout the entire weave, ensuring consistent filtering of foreign particles. The consistency also provides a benefit that is overlooked, turbulence. In the paper, cotton and sponge filters, the inconsistency of their hole-sizes introduces turbulence in the air-flow. With Sprint Filter’s technology, the turbulence is completely eliminated.
We gotta mention the maintenance too, because all you need is a can of compressed air and it’s good to go.
This all started in 2010 when Sprint Filter launched its motorcycle line. And they’ve only grown since then. Right now, they supply filters to over 70% of the MotoGP teams.
Sprint Filter Specs
P08 Filter:
Airflow: 5050 liters per meter square a second
Traps 93.13% of 100 (micrometer) particles
Cotton filters only reach numbers between 3700-4800 liters per meter square a second, depending on the number of layers used.
P08F1-85 Filter:
Airflow: 15,000 liters per meter square
This is the filter used by many top level factory racing teams in MotoGP and WSBK
Besides the polyester fabric, it also has a steel mesh with epoxy coating. This mesh is to make sure the filter doesn’t collapse while the engine is running at high revs.
Are you using Sprint Filter currently? What are you running on your bike at the moment? Check out our video on this topic for further details, and let us know what topics you want to see us cover next!
]]>
https://www.motomillion.com/blogs/motomillion-blog/how-to-install-twm-remote-adjuster-on-bremco-rcs-192018-01-07T12:37:00-05:002018-01-07T12:39:27-05:00HOW TO - Install TWM Remote Adjuster on Bremco RCS 19Mani AzeriTWM Special Components is our go to brand when choosing a remote adjuster for our Brembo master cylinders. Remote adjusters provide micro adjustment of the brake lever position and is compatible with the RCS radial master cylinders. This adjustment comes in handy on the racetrack when the rider wants to dial out brake fade while keeping your right hand on the throttle on the straights, and be pinned on the throttle.
Installation of the TWM remote adjuster is very simple, and takes only minutes.
To view the product being installed in our store, click HERE
Tools you will need are:
- 2mm Allen Key Socket
- Drill with fine bits
Let's Begin!
1. Firstly we need to remove the adjustment knob from the 19RCS. Using your drill with a small bit, drill the center of the adjustment knob.
2. Pull to remove the adjustment knob, you can chose to carefully use pliers to get a better grip to pull the knob out.
3. Insert the adapter supplied by TWM into place, and using the 2mm Allen Key Socket tighten the set screw to secure it into place.
4. Insert the supplied cable into the end of the adapter and using your 2mm Allen Key Socket tighten the set screw to secure the cable into the adapter.
5. Insert the other end of the cable into the TWM Remote Adjsuter and again using the 2mm Allen Key socket tighten the set screw to secure the cable into place.
6. Install the TWM Remove Adjuster on to your left handle bar where it is within the reach of your thumb.
And that is it! You've done it.
Be aware of the knock-off replica remote adjusters that are out there. TWM Remote Adjusters are available through authorized TWM dealers, and have lifetime warranty against manufacturing defects and fading of its anodizing. Authentic TWM Remote Adjusters can be identified by the distinct laser etched markings including the production date markings.
Copyright (2018) - www.motomillion.com
]]>
https://www.motomillion.com/blogs/motomillion-blog/guide-go-with-the-flow2018-01-03T13:02:00-05:002018-01-03T21:05:55-05:00GUIDE - Go With The FlowMani AzeriThe age old question of what air filter is the best has been asked as long as the internet has existed. It is the year 2018 now, and a lot of technological advancements have been made in the world of filtration as the machines that are being raced and the ones which we ride are becoming more sophisticated and demanding.
In this article we are going to explain why we chose only Sprint Filter as our go to air filters and what makes them completely different from others even though 3rd party dyno testing and even a comprehensive 3rd party laboratory analysis has shown Sprint Filter to be superior when compared to any others out there.
Air filters serve two main purposes on the motorcycle, the primary purpose for them is to block foreign particles from entering into the cylinder chamber, and secondly to allow good air flow in order to let the engine breathe. This has been a constant battle, since traditionally good air flow meant compromising on the filtration capabilities, this is where materials and the substances used played a major role.
For a long time (and they still are) air filters were primarily made of paper, cotton, or sponge type materials which were often soaked in oil for performance applications. The main purpose of the oil is to catch dust particles which would make it through since the size of the holes in these materials can not be the exact same size throughout the filter, this is one of the main limitations of using paper, cotton or sponge type material.
Thanks to Sprint Filter, there is another material being used in the making of air filters which is a huge leap forward compared to traditional methods and materials being used.
Sprint Filter has revolutionized the air filter market by using polyester fabric to construct their air filters. Unlike other materials we discussed above, polyester fabric is a solid material which is not affected by folding, difference in pressure nor during being handled for maintenance. Only a single layer of polyester fabric is used when making Sprint Filters as compared to having multiple layers of other materials used to achieve filtration properties that are needed for an air filter.
Using polyester fabric has made Sprint Filter capable of making each hole in the fabric exactly the same size. This enabled these air filters to control exactly the amount of air and the size of the particles which would pass through.
Furthermore using polyester fabrics have made these air filters to be lifetime filters, meaning you will never have to replace it as long as you take proper care of them, which is as simple as removing it and cleaning it with compressed air, that is it!
Now that we know what sets apart Sprint Filter air filters from others in terms of the materials used, lets look at the different polyester fabrics that Sprint Filter uses. We have put each polyester fabric under a microscope for you, this way, you can see what we are raving on about.
P08 Polyester Material
This redish orange color polyester material is used on the most popular Sprint Filter air filters, which is ideal for road and track use. It provides an air flow of 5050 liters per meter square a second while being able to trap 93.13% of 100 μm (micrometer) particles.
Cotton air filters are able to achieve only numbers between 3700-4800 liters per meter square a second depending on how many layers are used in their construction. Lets not forget that with a cotton filter at the higher end of that flow scale you are going to be letting too many particles through, trapping only 76.42% of 100 μm particles.
This is why the Sprint Filter P08 air filters have been the most popular choice for consumers who wanted maximum performance from a performance street air filter.
P16 Polyester Material
The P16 polyester material was developed only for racing use, as you can see the size of the holes in the material are larger than the P08. This allows for almost double the air flow at 10000 liters per meter square while the filtration capability is at 160 μm. Due to the filtration capabilities, it is not advised to be used on the street.
The Sprint Filter P16 air filters have been used by many top level race teams around the world due to its unrivaled qualities as a filter and its performance.
P08F1-85 Polyester Material
Developed and used by many top level factory racing teams in MotoGP and WSBK, the P08F1-85 polyester material is the latest polyester material which Sprint Filter has introduced. This patented material is a huge leap forward in the world of filtration because it allows an air flow of 15000 liters per meter square while guaranteeing a filtration capability of particles as small as 85 μm. These are some very impressive numbers which are unmatched by any other air filter on the market.
These numbers have been achieved not only because of the polyester material which has been used, but also as you can see in the pictures it utilizes a steel mesh with an epoxy coating as the supporting layer for the polyester material. The main purpose of using mesh on air filters is to make sure the filter does not collapse while the engine is sucking the air, especially during such high air flow instances.
The new steel mesh uses thinner strands that have larger openings. This has allowed the surface area of the polyester material to increase from 66% (as it is with the P08 and P16) to 80% of the total air filter surface.
The P08 and the P16 polyester materials were already able to out perform any other performance air filter on the market due to their construction. Sprint Filter have far out done themselves with the introduction of this P08 F1-85 air filter and now you know exactly how they have made this incredible achievement possible.
The P08 F1-85 air filters are available for consumers to purchase as of December 2017 for the most popular sport bike applications and are available through our website at www.motomillion.com
]]>
https://www.motomillion.com/blogs/motomillion-blog/5-mods-you-didnt-think-of-as-weight-reduction2017-11-28T22:33:00-05:002017-11-29T12:11:16-05:005 Mods You Didn't Think Of As Weight ReductionMani AzeriIt is no secret that here at Motomillion we have a love affair with carbon fiber and titanium. These exotic materials are what most riders think of when the topic is weight reduction. However there are some other modifications which are fairly common but are not necessarily first things we list when talking about weight reduction.
The examples below are all from a BMW S1000RR but the results are consistent across all the range of modern sportbikes.
Here are 5 mods you didn't think of as weight reduction:
1. Fender Eliminator
Dare we say this is the most common modification which we all do to our street bikes before we even bring them home for the first time? We really like the fender eliminators made by New Rage Cycles because while looking great, they do not compromise on safety. The integrated led signals which they supply on most of their kits are brighter than stock. What if we told you that it weighs less than the stock fender?
Pictured is the stock fender of an S1000RR weighing in at 658grams (1.45lbs)
The New Rage Cycles Fender eliminator for the S1000RR only weighs 321grams (0.71lbs).
That is pretty impressive given that the stock fender is made from plastic, while the New Rage Cycles fender eliminator is made from metal and is powder coated to match the finish of the tail of your S1000RR. Furthermore this is weight reduced from one of the highest point of the motorcycle.
2. Levers
This is another very common upgrade with sportbike owners, mainly for ergonomics and visual purposes. We are very big fans of the TWM levers here at Motomillion, because of the racing heritage, fit, finish and the functionality of them. Unlike others these are truly race bred levers which can be spotted at the highest form of competition all over the world. Weight is a big variable when it comes to racing machines and it has trickled down to the smallest details like the brake and clutch levers.
The stock OEM levers for the BMW S1000RR weighed in at 289grams (0.64lbs)
Even though it has the signature turn-by-click span adjuster on the brake side the TWM Brake and Clutch levers for the BMW S1000RR weighed in at 208grams (0.46lbs).
3. Gas Cap
The next mod on the list is again from the Italian Artisans, TWM. Another fairly popular upgrade which most sportbike owners do to improve functionality and aesthetics. Often never thought as a weight reduction item.
We must mention that the stock gas cap on the S1000RR is fairly lightweight for an OEM gas cap, weighing in only at 178grams (0.39lbs). Just to compare, the stock gas cap on a Ducati Panigale weighs in at 255grams (0.56lbs).
The TWM Quick Action Gas Cap for BMW S1000RR weighs in only at 106grams (0.23lbs).
4. Rear Brake Rotor
One main area which we can upgrade to change the overall performance of a sportbike is the unsprung weight. When talking about unsprung weight, wheels usually dominate the discussion, followed with titanium fasteners, sprockets and often the rear brake rotor is forgotten. MM Racing of Canada produces some beautiful rotors which are also ultralight.
The stock rear rotor of a BMW S1000RR weighs in at 734grams (1.62lbs). This figure would be marginally higher since the rotor which we weighed had been used, so it is missing some material.
MM Racing Ultralight Rear Rotor for the BMW S1000RR weighs in only at 481grams (1.06lbs).
5. Rear Brake Reservoir Delete
This is one of the forgotten upgrades with the modern sportbike crowd. Early in 2000's this was one of the must do upgrades to get that racing look. Even to date, many race top level race machines around the world utilize this trick bit of kit to shave off the last bit of unnecessary weight.
The idea is to get rid of the extra weight of the rear brake fluid reservoir by deleting it, and further optimizing the weight reduction since the HRC (Honda Racing Corporation) rear brake reservoir kit holds less fluid than what a traditional brake fluid reservoir.
The stock rear brake reservoir, hose and the metal bracket for the BMW S1000RR weighed in at 180grams (0.40lbs). (We weren't able to get a picture of this item on the scale due to some technical issues, but here is the offending object for you to see).
The HRC rear brake reservoir delete kit weighed in at a featherweight 31grams (0.07lbs).
This was our list of 5 mods you didn't think of as weight reduction. We hope that you enjoyed reading it as much as we enjoyed putting it together for you.
You can view all of the products for the BMW S10000RR which we have displayed in this blog at the links given below, check out our website www.motomillion.com to view similar items for other brands of superbikes:
]]>
https://www.motomillion.com/blogs/motomillion-blog/low-drag2017-11-11T13:07:00-05:002017-11-11T13:08:24-05:00DETAILS - Upgrades for the Brembo 19 RCS Master Cylinder - Part 1Mani AzeriUpgrading your stock master cylinder to the Brembo 19 RCS master cylinder is often one of the best upgrades you can do to your sport bike in terms of braking. Be it on the street or on the track, the 19 RCS has been the most popular brake master cylinder for almost a decade.
As avid motorcycle enthusiasts we are always looking into that special extra touch with everything we install on our bikes. One thing that might have caught your attention when watching a MotoGP race could have been the holes on the end of the levers. These levers are often referred to as the "low drag" levers. As the name suggests, the purpose of these holes is to reduce the aerodynamic drag.
The low drag levers were invented as the solution to mysterious brake fade former MotoGP Rider Loris Capirossi had been experiencing at the end of the Misano straight. Such a simple solution took quiet a bit of research and development to discover. It turned out that the aerodynamic drag was applying pressure on the brake lever which was responsible for the brake fade.
This simple and very cool looking upgrade is available for the Brembo 19 RCS master cylinder. Available in standard and short lengths, these low drag levers are made by TWM with the matching hard anodized finish of the Brembo 19 RCS. (Below: You can see the stock lever blade of the 19 RCS in the middle, standard length to the left and short length to the right)
Very simple to install, tools needed are an 8mm wrench and a 4mm Allen key. Literally takes seconds to swap over.
As we often say, the beauty lies in the details. Look out for Part 2 of the upgrades for Brembo 19 RCS Master Cylinder to be published soon our the Motomillion Blog. Till then, we leave you with the detailed pictures of this subtle upgrade.
Above and Below: Standard Length TWM Low Drag Half Lever for Brembo RCS
Below: Shorty Length TWM Low Drag Half Lever for Brembo RCS
Copyright (2017) - www.motomillion.com
]]>
https://www.motomillion.com/blogs/motomillion-blog/how-to-install-rapidbike-evo-fuel-controller-module-on-a-bmw-s1000rr2017-05-03T10:49:00-04:002017-05-03T15:01:36-04:00How To Install Rapidbike Evo Fuel Controller Module on a BMW S1000RRMani AzeriRapidbike EVO is our favorite fuel controller module and it is by far the best product of its kind which is available on the market today. Naturally, this is what we installed on our BMW S1000RR in order to maximize the power gains from the Sprint P08 Filter and the Akrapovic Evolution Line full titanium exhaust system that are already on this bike.
This is a detailed how-to install for the Rapidbike EVO fuel controller module, the bike in picture is a 2015 model year, but installation steps are identical for the 2015 to 2017 model years.
Installation is fairly simple, however you will need to pay attention to the routing of the wires to make sure nothing gets pinched once you start putting the bike's components back together. So while performing the install, try to keep the wiring as neat and tidy as possible.
We recommend having as little fuel in the gas tank as possible before performing this install.
To view the product being installed in our store, click HERE
Tools you will need are:
- T25 Torx Driver
- T30 Torx Driver
- Side Cutter Pliers
- 10mm Socket
- Rag
Let's Begin!
Start by removing the side fairings, riders seat, rear seat, tank cover, tank side panels and finally the gas tank. The gas tank has two connectors underneath, and the fuel line comes off when you twist it, make sure to lay a rag underneath the gas tank to catch the gas that will spill from the line once its disconnected.
Feed the wiring harness into the tail section from the left hand side of the bike. The large orange connector is what the module will connect to, and this is what you want in the tail section, along with the accessory connectors next to it.
In order to make room to feed the rest of the wiring harness, loosen the four bolts of the seat bracket which is on the rear subframe.
Run the harness under the seat bracket, you can see the Rapidbike Evo harness highlighted in red in the picture below, to give you an idea on how to route it.
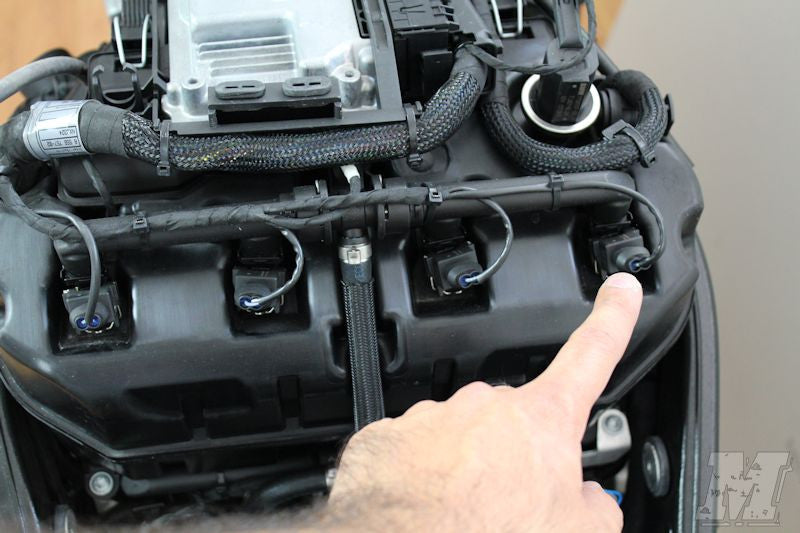
Locate the four lower injectors. Injector #1 will be the left most injector and it continue in numerical order.
Injector #1 Injector #2 Injector #3 Injector #4
Connect the Rapidbike Evo harness inline to each injector as numbered on the harness.
Locate the four upper injectors. Injector #5 will be the left most injector and it continue in numerical order.
Injector #5 Injector #6 Injector #7 Injector #8
Connect the Rapidbike Evo harness inline to each injector as numbered on the harness.
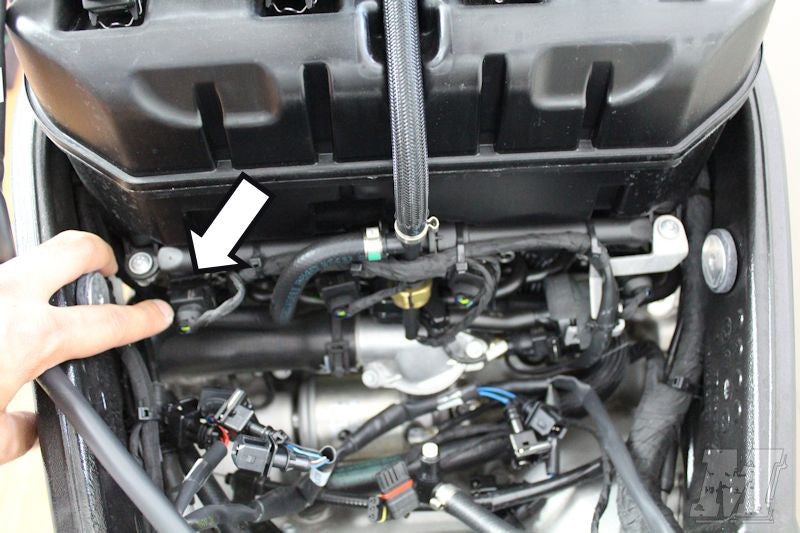
Locate the 2-pin black connectors for the crankshaft sensor and connect the Rapidbike connectors in-line with the stock connectors.
Locate the grey, 6-pin connector for the TPS sensor, and identify the wire which is connected to the number 2 pin of the connector. Using the posi-tap connector provided, connect the green wire from the Rapidbike EVO harness to the wire coming out of the number 2 pin of the TPS connector.
Locate the 4-pin black connectors for the O2 sensor on the left side of the bike and connect the Rapidbike connectors in-line with the stock connectors. Use zipties to neatly secure the connectors together as shown in the second picture below.
Locate the 4-pin black connectors for the O2 sensor on the right side of the bike and connect the Rapidbike connectors in-line with the stock connectors. Use zipties to neatly secure the connectors together as shown in the second picture below.
Locate the 3-pin black connectors for the gear position sensor and connect the Rapidbike connectors in-line with the stock connectors.
Double check all the connectors that was just installed in the steps above to make sure everything is connected securely. Start tidying up the Rapidbike Evo wiring harness to make sure the gas tank will slide into place without pinching any wires and/or hitting any of the connectors. Use zip ties to secure the harness at necessary places. In this case, we used secured the upper injector harness at two locations, and the main Rapidbike Evo harness on the left side near the frame.
Connect back the two connectors and the fuel line back underneath the tank, and mount the tank into place. Do not force the tank into place if it is hitting any of the connectors or wires, just try to tuck away the wires or connectors and try again. Once the tank is in place, do not forget to reattach the two breather wires located at the front top sides of the gas tank.
Connect the black wire from the Rapidbike Evo wiring harness to the negative terminal of your battery.
Lastly, connect the large connector from the Rapidbike Evo wiring harness located under the rear seat to the Rapidbike Evo module. We tucked away the accessory connectors right under the tool kit spot, and used zip ties to secure the Rapidbike Evo module so that it isn't freely moving around under the seat while riding.
If you've followed all the steps correctly, your bike should now start and the atuo-adaptive feature will start to immediately make required adjustments to the tune of your bike.
Once you've verified that the bike starts, re-sintall the side fairings, riders seat, rear seat, tank cover, tank side panels.


 Injector #2
  Injector #3
  Injector #4


 Injector #6
  Injector #7
  Injector #8