How To Set Up UpMap on Your Bike


How To Set Up UpMap on Your Bike
"UpMap is a project born from the need to improve the performance of the vehicle, in a scenario where the continuous development of electronics makes it increasingly difficult to achieve this goal with the exclusive use of exhaust systems.”
With a variety of tunes available designed for specific exhaust systems, and to remove factory restrictions, UpMap has become an essential part for unlocking the true performance of your bike.
It has even become a go-to for Streetfighter V4 / Streetfighter V4S models that have a full exhaust or a slip on, since the UpMap flash will disable the exhaust servo. Without the upmap flash you will get a check engine light on your dash.
It isn’t a necessity, but it is highly recommended. It removes the potential check engine light from having the servo removed, smoothes the throttle and puts the correct mapping on your ECU to take full advantage of the installed exhaust system.
With UpMap being such an essential asset for modified superbikes, we created this write up for an easy-to-follow tutorial to get it going on your bike.
Before getting your UpMap tune on your bike, double check that you have ordered the right plug. Your bike may have either the EU4 plug, which is the 4-pin, yellow rectangular plug, or the EU5 plug, which is 6-pin, square and red.


Usually, you can find the diagnostic plug under the rider seat (this was the case for our Ducati Streetfighter). You will either see a 4-pin (EU4) or 6-pin (EU5) plug.
Once you confirm your plug, order the correct model UpMap device and let’s get started.
Plugging In
As stated above, on most motorcycles, you will find the diagnostics plug under the rider seat. Proceed to remove your rider’s seat to access the plug.
On the Ducati Streetfighter V4S, you’ll find two bolts holding down the seat at the rear-most end. Pry the seat forward to access the bolts.


Once your seat is removed, plug in the UpMap device to the connector plug, and then connect it to your motorcycle’s diagnostic plug. Double-check that the plugs have clicked in correctly and are not loose (you do not want them coming undone while doing the map upload).


You should see the UpMap device light turn on, notifying that it is functioning and receiving power.

Finally, check that your bike is in the run position and you can now move on to the phone app.

Connecting Your UpMap
If you have not done so, head to your app store and download the UpMap app. You’ll find it by searching for UpMap.
On the main screen of the app, start by tapping the helmet icon. Then devices, and click on the plus sign (+) to add your UpMap device.


There will be a disclaimer and terms & conditions that you must accept to proceed.
After, you will have a screen showing what you must have to establish the connection.
- UpMap device and cable
- Active Internet connection
- Bluetooth On
- Run/Stop button in Run position

Once you’ve verified everything, select “Go” and proceed to select your motorcycle manufacturer. This will take you to a screen that demonstrates where you can find the diagnostics plug on your specific model.


Continue on, and you will be notified to plug in your UpMap device (if you have not done so already). Then, turn on your ignition (do not start the bike). And finally, make sure that your bluetooth is turned on.


Your phone will now search for the UpMap device. Once it is found, you will see it named by its serial number. If you have more than one UpMap device present, confirm that you are connecting to the correct device by the serial number.

Select the UpMap device, and click on Configure. The app will now update the UpMap firmware.
After the firmware is up to date, it will automatically detect your motorcycle model. Confirm that the selection is correct by clicking on the model, and then select Configure. Finally, select Confirm and End Configuration.


Getting Your Free Map
You’re halfway there. Now it’s time to select your map.
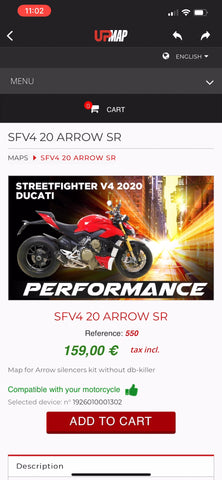
Navigate to the home screen, and tap on the shopping cart icon. On the top right there will be a drop down menu to select English if you need to.


You will see all the maps available for your motorcycle. In our case, we installed the Arrow Works Full Titanium Exhaust on the Streetfighter V4, so we chose the applicable map for it.

With your map selected, add it to your cart, and proceed to fill out the information. Make sure that the information is your own to ensure that you have full access to your motorcycle’s mapping.
Before completing your purchase, there will be a text box for vouchers. Type in “Termignonigift” to receive your first map for free.

Complete your order, and then navigate back to the home page. Tap on the helmet, and select the Maps tab. You should see your purchased maps here.


Now it is ready to be flashed onto your bike.
Flashing Your Bike
While in the Maps tab, to start the flash just tap on the map you have purchased, and select Confirm.

You will need to double check all your connections again, and that your ignition is On and in the Run position.

Once you confirm, then your phone will begin downloading the map data onto the UpMap device. This may take a few minutes. Remember to stay as close as possible to your UpMap device during these final steps to prevent any connection issues.
After it is downloaded onto the UpMap, it will begin the process of setting it up on your bike. Let it finish, and the process is complete!

With your bike now remapped, you will need to run it through 3 ignition cycles so that the ECU can adapt to the new baseline. One ignition cycle means turning on the bike, letting it warm up, take it out for a short ride and then shut it off. Repeat it 3 times, and it should be settled.
Enjoy your new UpMap tune!
2 Responses


Exotica
January 27, 2025
1. Verify Compatibility: Ensure you have the correct UpMap device for your bike’s diagnostic plug type:
EU4 Plug: 4-pin, yellow rectangular connector.
EU5 Plug: 6-pin, square red connector.
Typically, the diagnostic plug is located under the rider’s seat.
MOTOMILLION.COM
2. Connect the UpMap Device:
Remove the Rider’s Seat: Access the diagnostic plug by removing the seat.
Plug In the UpMap Device: Connect the UpMap device to the diagnostic plug, ensuring a secure connection.
Power On the Bike: Set the ignition to the ‘Run’ position without starting the engine.